

When it comes to stunning ombré nails, you’ll love the versatility! Start with a classic pink and white ombré for an elegant touch, or go bold with a vibrant blue to purple gradient that turns heads. If you’re feeling summery, try a sunset-inspired orange and yellow blend. For a softer vibe, the nude to blush ombré is perfect. There are endless creative styles, and I can’t wait to share even more colorful inspirations with you!
Contents
- 1 Classic Pink and White Ombré
- 2 Bold Blue to Purple Gradient
- 3 Sunset-Inspired Orange and Yellow
- 4 Elegant Nude to Blush Ombré
- 5 Tropical Green to Teal Blend
- 6 Vibrant Rainbow Ombré
- 7 Soft Pastel Rainbow Fade
- 8 Dark Ombre With Glitter Tips
- 9 Monochrome Grey Gradient
- 10 Rich Burgundy to Rose Gold
- 11 Bright Coral and Peach Transition
- 12 Subtle Lavender to Lilac
- 13 Ocean Waves: Aqua to Navy
- 14 Chic Black to Silver Ombré
- 15 Metallic Gold and Champagne Blend
- 16 Rustic Earthy Tones Ombré
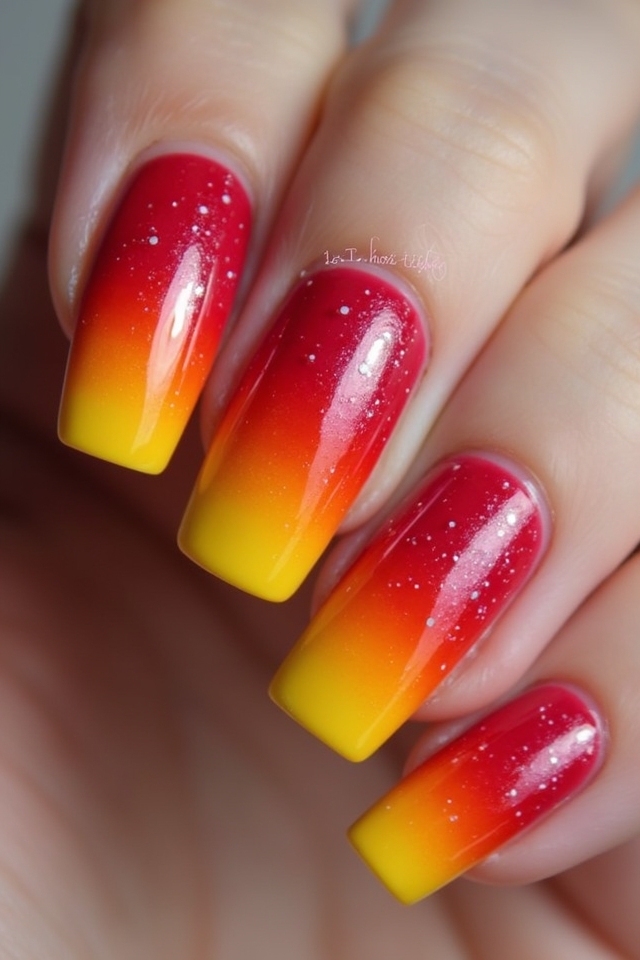
- 17 Fiery Red to Orange Fade
- 18 Whimsical Cotton Candy Pink and Blue
- 19 Deep Forest Green to Mint
- 20 Icy Blue to White Ombre
- 21 Jewel Toned Amethyst and Emerald
- 22 Soft Peach to Cream Fade
- 23 Neon Pink to Yellow Ombre
- 24 Delicate Floral Ombré Design
- 25 Seasonal Fall Colors: Orange, Red, and Yellow
- 26 Frequently Asked Questions
- 27 Conclusion
Classic Pink and White Ombré
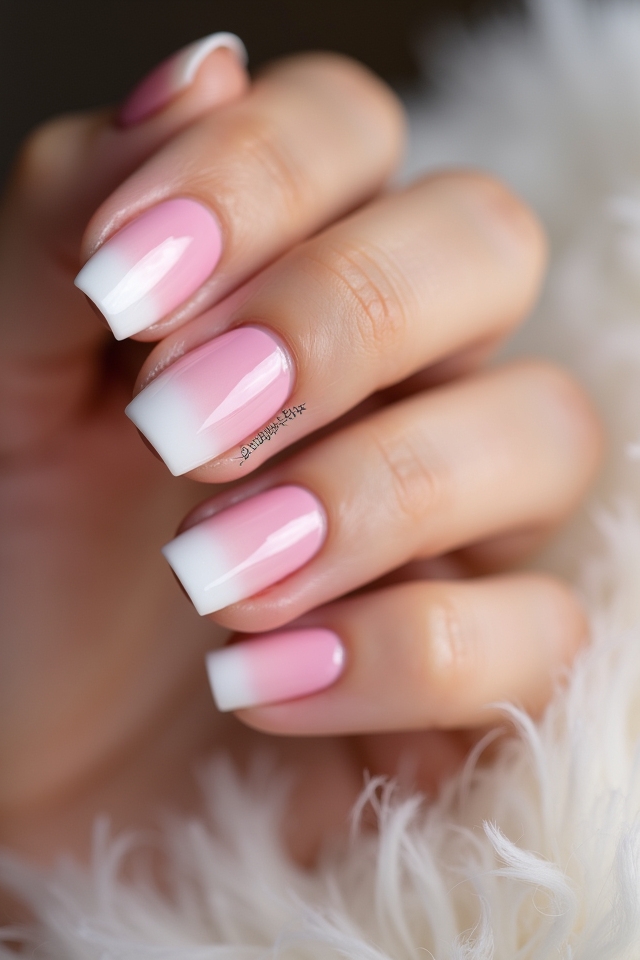
When it comes to nail art, the classic pink and white ombré is a timeless favorite that beautifully blends elegance with a touch of whimsy. I love how the soft progression from classic pink to a delicate white gradient creates a stunning effect. To achieve this look, gently blend the colors, ensuring a smooth finish. You’ll feel chic and sophisticated, ready to show off your nails!
Bold Blue to Purple Gradient

After exploring the classic pink and white ombré, let’s shake things up with a bold blue to purple gradient that’s sure to turn heads! Combining vibrant blue hues with deep purple, this look uses gradient techniques to create a stunning visual effect. Start by blending the colors at your tips, gradually fading them for a mesmerizing shift. Trust me, you’ll love it!
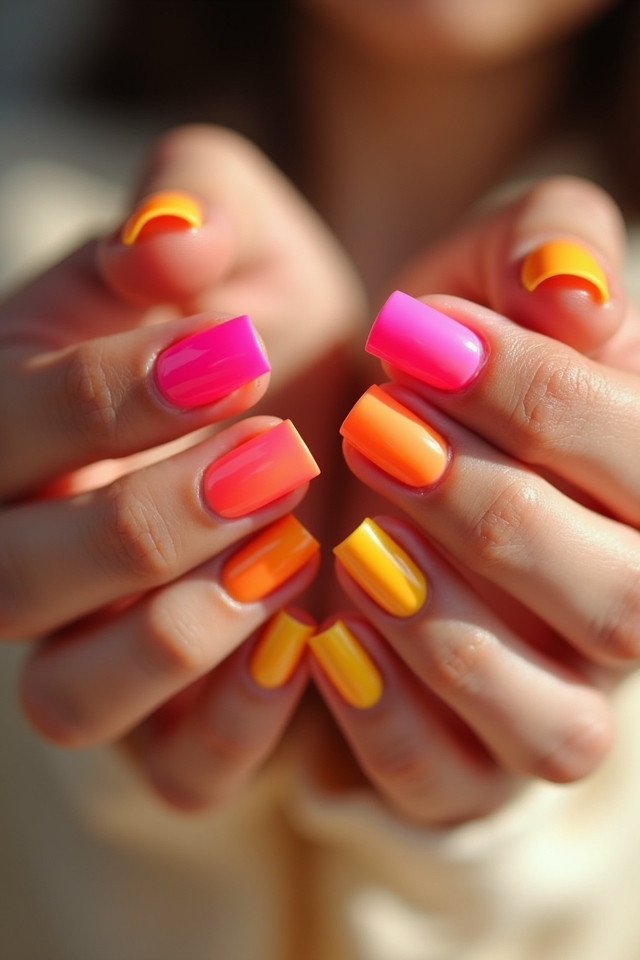
Sunset-Inspired Orange and Yellow
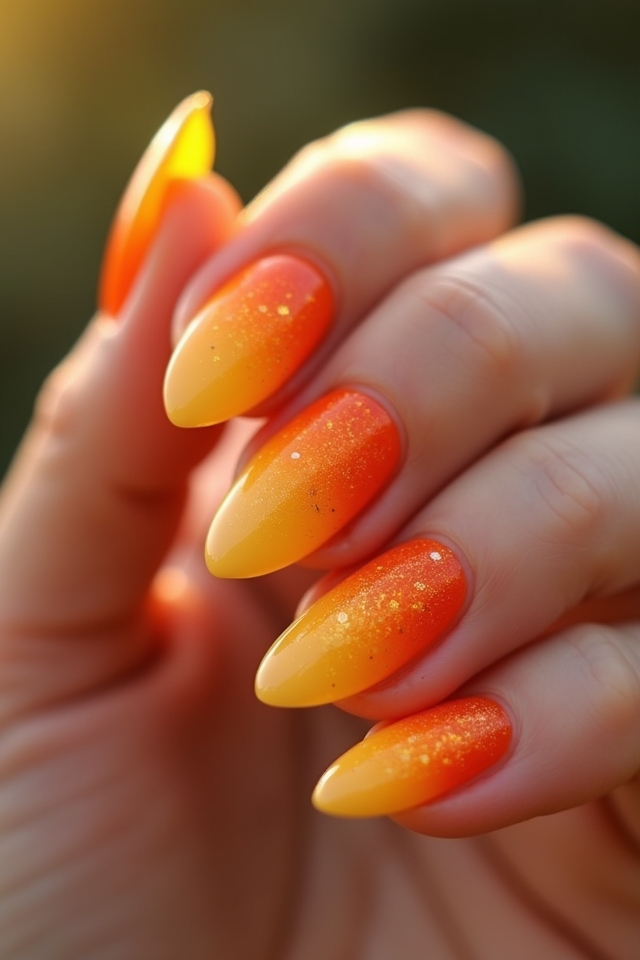
Imagine stepping into a warm summer evening, where the sky transforms into a breathtaking canvas of orange and yellow hues—this is the inspiration behind sunset-inspired ombré nails! Using innovative ombré color techniques, you can create stunning sunset nail art that captures this beauty. Here’s a quick guide to inspire your next manicure:
| Base Color | Gradient Color | Top Color |
|---|---|---|
| Bright Orange | Golden Yellow | Soft Peach |
| Coral | Lemon Yellow | Cream |
| Tangerine | Sunflower Yellow | Lemonade |
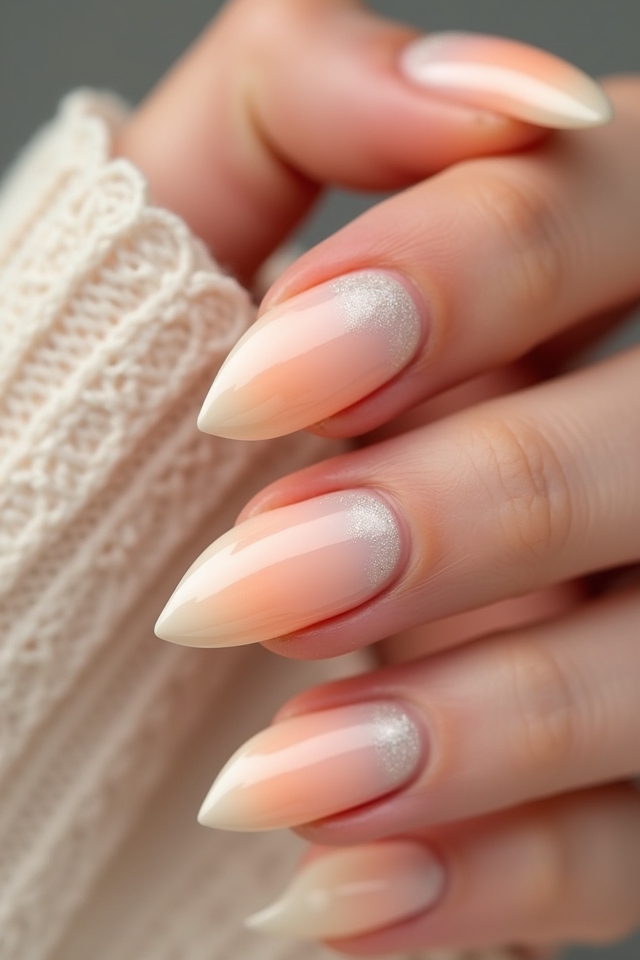
Elegant Nude to Blush Ombré
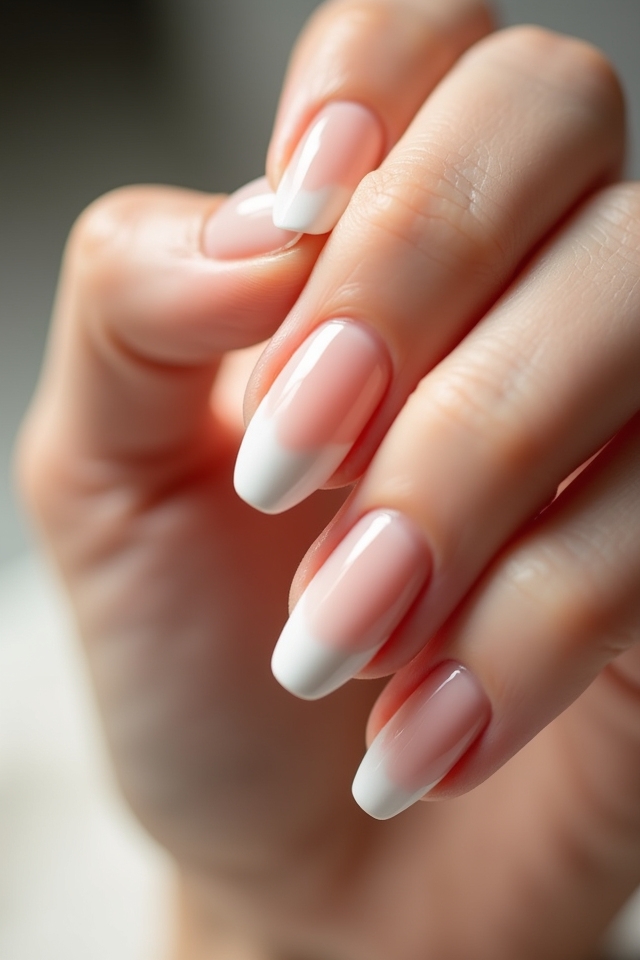
While you might think of bold colors for your next manicure, there’s something effortlessly chic about the elegant nude to blush ombré look. I love how the soft nude shades shift into delicate blush tones, creating a beautiful gradient that’s perfect for any occasion. It’s a stylish choice that feels fresh and innovative, making your nails a subtle statement of elegance. Give it a try!
Tropical Green to Teal Blend
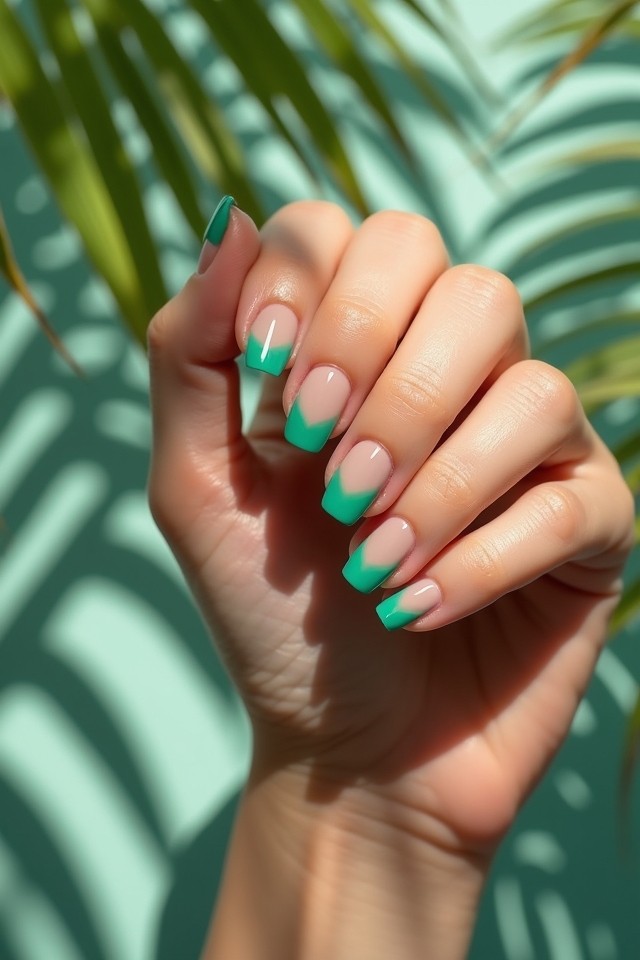
If you’re looking to add a splash of vibrancy to your nails, the tropical green to teal blend is a fantastic choice. This striking combination evokes tropical vibes, instantly transporting you to a sunny paradise. By mastering color blending techniques, you can create a seamless shift between shades. Trust me, this ombré style will definitely turn heads and inspire others to get creative!
Vibrant Rainbow Ombré
Creating a vibrant rainbow ombré on your nails can transform a simple manicure into a dazzling work of art. By using vibrant techniques and bold color combinations, you can achieve a stunning gradient effect that truly stands out. I love blending shades like electric blue, fiery orange, and vivid pink for an eye-catching look. Don’t be afraid to experiment and let your creativity shine!
Soft Pastel Rainbow Fade

After exploring the bold and vibrant world of rainbow ombré, let’s shift gears and embrace the softer side of nail art with a gentle pastel rainbow fade. This technique is perfect for those who love subtle elegance. Here’s a quick guide on pastel color combinations and ombré nail techniques:
| Color 1 | Color 2 |
|---|---|
| Soft Pink | Lavender |
| Baby Blue | Mint Green |
| Peach | Pale Yellow |
Let your creativity shine!
Dark Ombre With Glitter Tips

Dark ombré with glitter tips is an eye-catching trend that adds a touch of glamour to any look. I love experimenting with dark color combinations like deep navy and rich burgundy. Using various glitter application techniques, I create stunning tips that catch the light beautifully. This style not only elevates my nails but also sparks creativity and boldness in my overall aesthetic!
Monochrome Grey Gradient
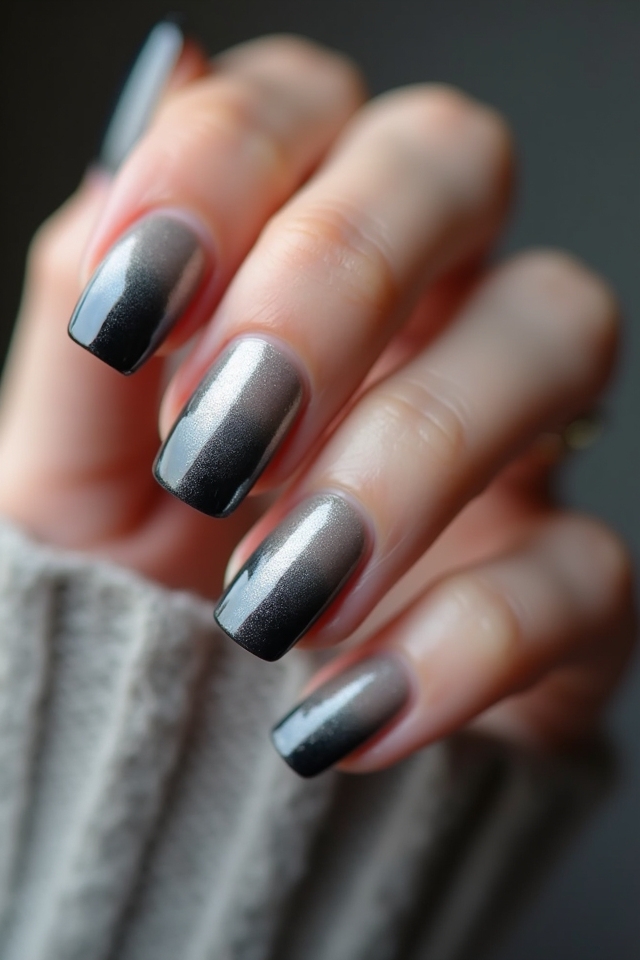
Shifting from the bold glamour of dark ombré to the sleek elegance of a monochrome grey gradient opens up a world of sophistication. I love exploring ombre techniques that blend light and dark greys, creating stunning gradient styles. This minimalist look is perfect for any occasion, effortlessly chic yet modern. Try it out, and you’ll see how it elevates your nail game!
Rich Burgundy to Rose Gold

There’s something undeniably enchanting about the change from rich burgundy to rose gold in ombré nails. This stunning shift captures attention, blending deep burgundy shades with a delicate rose gold shimmer. To create this look, start with a dark base and gradually blend in the lighter hue. The result? A mesmerizing effect that’s perfect for any occasion, making your nails truly stand out!
Bright Coral and Peach Transition
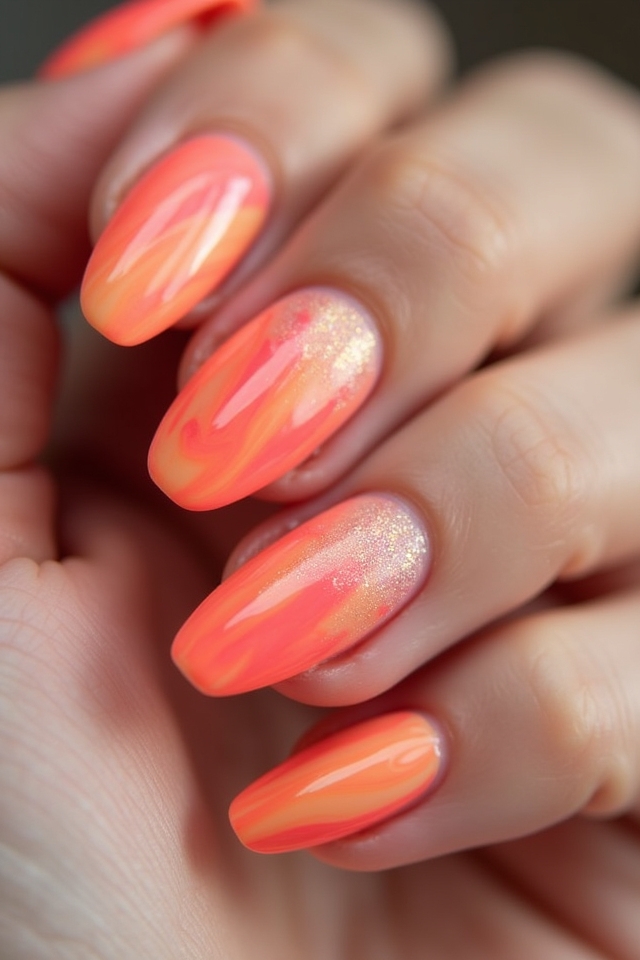
After exploring the enchanting allure of rich burgundy and rose gold, let’s brighten things up with a vibrant combination of bright coral and peach. These coral nail designs shift beautifully with peach color combinations, creating a fresh and energetic look. I love how this pairing radiates warmth and positivity, making it perfect for any season. Give it a try—you won’t regret it!
Subtle Lavender to Lilac
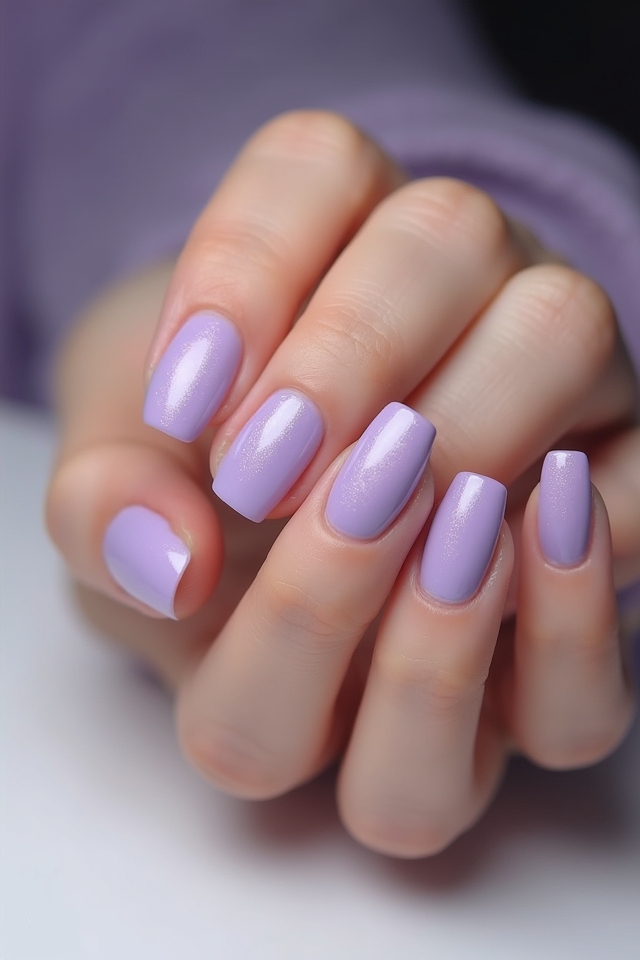
While exploring the delicate beauty of ombré nails, you’ll discover that a subtle lavender to lilac shift creates a serene yet enchanting look. This lavender nail art is perfect for those who love soft, dreamy vibes. Pair it with lilac color combinations for a fresh twist. I recommend blending these shades gradually to achieve a flawless gradient that feels both innovative and effortlessly chic.

Transforming your nails into an ocean-inspired masterpiece with an aqua to navy ombré effect can be an exhilarating experience! These oceanic hues evoke invigorating nautical vibes, making your nails a stunning statement. Start with a light aqua base, then blend in a rich navy at the tips. Don’t forget a glossy topcoat for that perfect shine, capturing the essence of the sea!
Chic Black to Silver Ombré

If you’re looking to add a touch of elegance to your nails, the chic black to silver ombré effect is a stunning choice. Here’s how to achieve perfection:
- Choose quality black and silver polishes.
- Master blending techniques.
- Practice ombré nail care for longevity.
- Finish with a glossy topcoat.
This look not only elevates your style but showcases innovative black silver techniques beautifully!
Metallic Gold and Champagne Blend
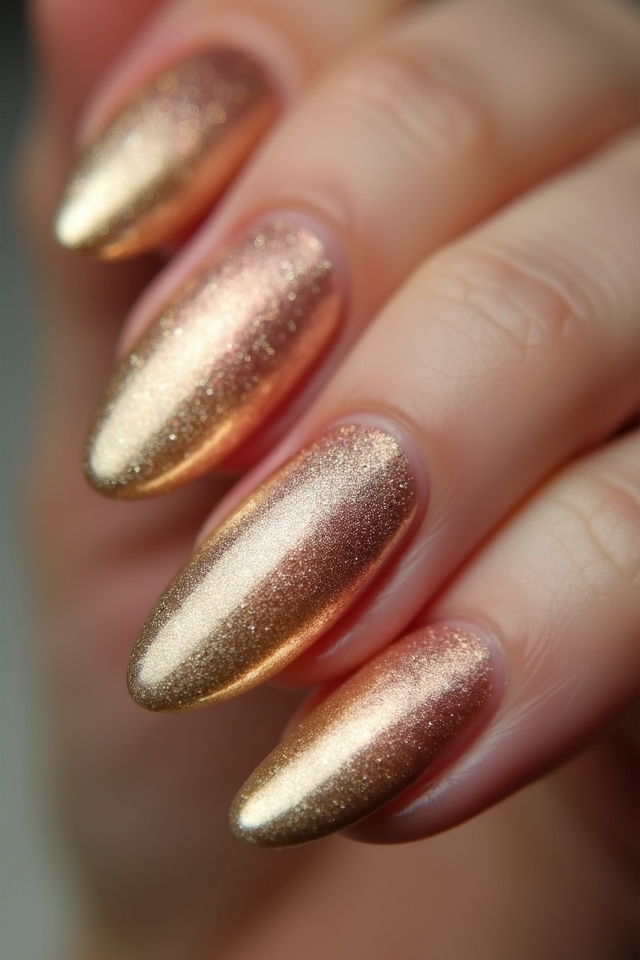
After exploring the chic black to silver ombré, let’s turn our attention to the luxurious blend of metallic gold and champagne. This stunning combination creates a mesmerizing metallic finish that’s both elegant and modern. The champagne shimmer adds a delicate touch, transforming your nails into a true work of art. Trust me, this look is perfect for making any occasion feel special!
Rustic Earthy Tones Ombré
Embracing the beauty of nature can inspire our nail art, and rustic earthy tones ombré does just that. I love how this earthy color palette brings warmth to my nails. Here are some ideas to inspire you:
Nature’s beauty inspires rustic nail art, bringing warmth and charm to your manicure with earthy tones.
- Start with a deep brown base.
- Blend in olive green.
- Add a touch of burnt sienna.
- Finish with a soft beige tip.
Get creative with rustic nail art!
Fiery Red to Orange Fade
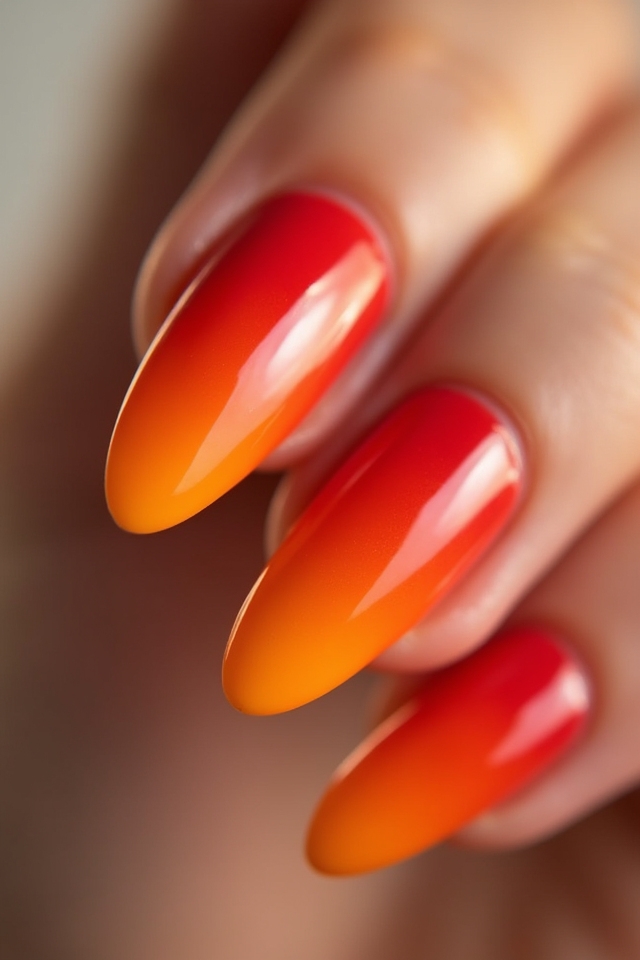
There’s something truly enchanting about a fiery red to orange fade on your nails, especially when you want to make a bold statement. I love experimenting with fiery red techniques to create an eye-catching look. Pairing this with vibrant orange gradient styles evokes a warm sunset. Trust me, when done right, this ombré effect will turn heads and spark conversations wherever you go!
Whimsical Cotton Candy Pink and Blue

When you want to capture the playful essence of a sunny day, whimsical cotton candy pink and blue nails are the perfect choice. Here’s how to embrace this trend:
- Start with a light pink base.
- Blend in soft blue at the tips.
- Add glitter for sparkle.
- Try whimsical nail art, like tiny clouds or hearts.
These cotton candy trends will brighten your day and inspire creativity!
Deep Forest Green to Mint

If you’re looking to bring a touch of nature’s elegance to your nails, the deep forest green to mint ombré is a stunning choice that effortlessly blends earthy tones with a revitalizing pop of color. This mint contrast against the deep forest hue creates a fresh, vibrant look perfect for any season. Trust me, you’ll feel connected to nature every time you glance at your nails!
Icy Blue to White Ombre
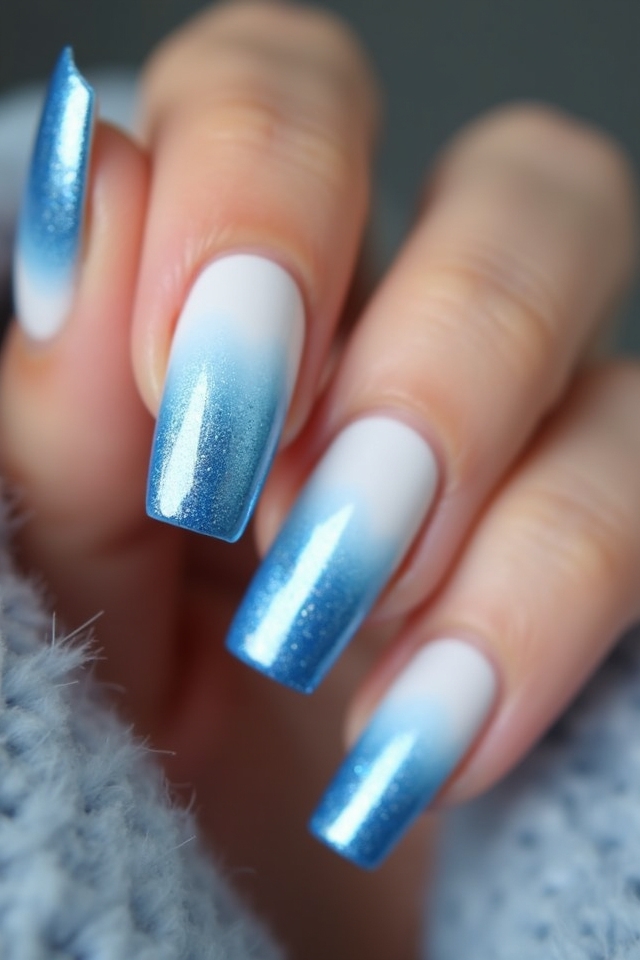
As I plunge into the world of nail art, the icy blue to white ombré stands out as one of my absolute favorites. This look perfectly captures winter nail trends and the beauty of icy blue shades. Here’s how to recreate it:
Diving into nail art, the icy blue to white ombré captures the essence of winter beautifully.
- Choose your icy blue polish.
- Apply a white base.
- Use a makeup sponge for blending.
- Finish with a top coat.
Your nails will shine!
Jewel Toned Amethyst and Emerald

The moment you dip your brush into jewel-toned amethyst and emerald, you’re transported into a domain of luxurious elegance. The rich amethyst sparkle blends beautifully with the deep emerald elegance, creating a stunning gradient that’s truly eye-catching. I love how this combination transforms my nails into a statement piece. Try this ombré design for an innovative twist that radiates sophistication and creativity!
Soft Peach to Cream Fade
After enjoying the rich hues of jewel-toned amethyst and emerald, embracing a softer palette can feel like a revitalizing change. I absolutely adore the soft peach to cream fade in my peach nail art! Here’s how to achieve it:
- Choose your shades.
- Use a makeup sponge.
- Blend with care.
- Seal with a topcoat.
Cream color blending creates a dreamy effect you’ll love!
Neon Pink to Yellow Ombre
There’s something undeniably electrifying about a neon pink to yellow ombre that instantly brightens up your nails and mood! Embracing the latest neon pink trends, I love using yellow ombré techniques to create a vibrant gradient. Start with a bold base of neon pink, then blend into a sunny yellow for a stunning effect. You’ll adore the playful energy it brings to your look!
Delicate Floral Ombré Design

When it comes to nail art, a delicate floral ombré design can transform your manicure into a stunning masterpiece. I love how it combines elegance with creativity. Here are a few ideas to spark your inspiration:
- Choose two or three coordinating colors for subtle color shifts.
- Add delicate petal accents for a whimsical touch.
- Experiment with different flower shapes.
- Finish with a glossy topcoat for a polished look.
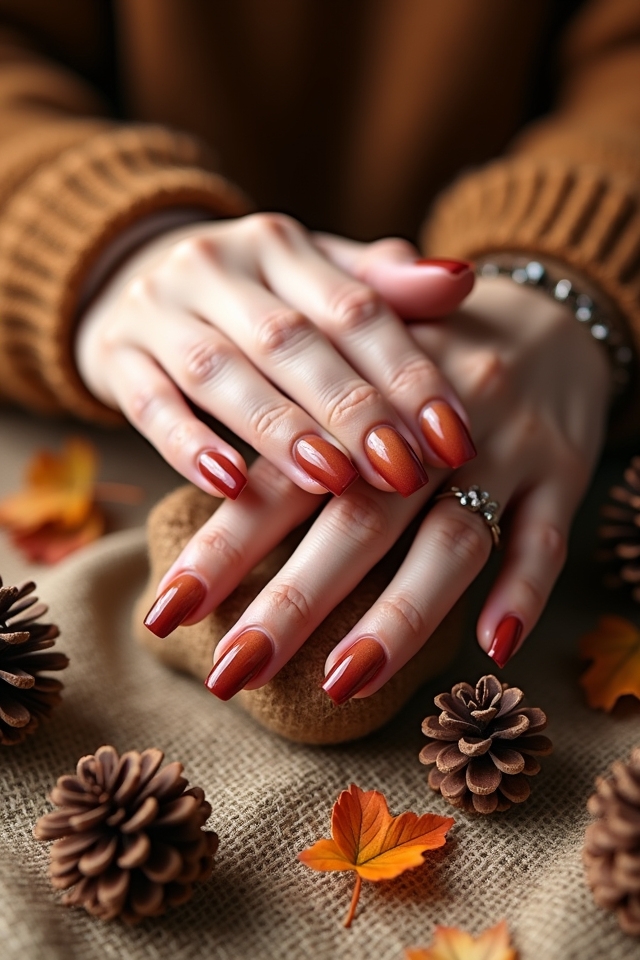
Seasonal Fall Colors: Orange, Red, and Yellow

As the leaves start to turn and the air gets crisper, I can’t help but feel inspired by the beautiful colors of fall—vibrant oranges, rich reds, and warm yellows. These shades are perfect for your fall nail trends, creating stunning ombré designs. Mix these autumn color palettes for a unique look that captures the essence of the season and showcases your creativity!
Frequently Asked Questions
How Do I Maintain Ombré Nails at Home?
I maintain my ombré nails by regularly moisturizing and applying a top coat to prevent color fading. I keep up with nail care routines and avoid harsh chemicals to preserve that beautiful gradient effect longer.
What Tools Do I Need for Creating Ombré Nails?
Creating ombré nails is like painting a sunset. I always use a nail sponge for blending colors and gradient brushes for precision. These tools make achieving that smooth, seamless change effortless and fun!
Can I Use Regular Nail Polish for Ombré Designs?
Absolutely, I use regular nail polish for ombré designs! With some practice in ombré techniques, you can achieve beautiful gradients. Just blend colors carefully, and you’ll create stunning looks with any polish you have.
How Long Does an Ombré Manicure Typically Last?
An ombré manicure typically lasts about two to three weeks, depending on nail longevity and care. I’ve found that regular touch-ups can extend the manicure duration, keeping it looking fresh and vibrant longer.
Are Ombré Nails Suitable for Short Nails?
I’ve found that ombré techniques work beautifully on short nail designs. The gradient effect adds depth and dimension, making even petite nails look stylish. Trust me, you’ll love the innovative flair it brings!
Conclusion
As you explore these stunning ombré nail designs, I hope you find inspiration that sparks your creativity. It’s amazing how a simple gradient can transform your look and elevate your mood. Whether you’re drawn to the bold blues or the soft blushes, there’s a style here just waiting for you to try. Coincidentally, the perfect manicure might just be the confidence boost you didn’t know you needed. So, grab those polish bottles and let your imagination run wild!